Thursday, October 18, 2007

Battle Report LOTR

On the Run

Description:

While on a routine check on an outlying Gondorian fort, Elendil and the fortress he is at comes under attack by a huge army of orcs. With no hope for reinforcements, the Gondorians decide to abandon the fort in the middle of the night and try to make it to the nearest Gondorian fort, two weeks march away. The next morning, the orcs find that the Gondorians are no longer in the fort, and run after them. Coming upon the Gondorians in the wild, the orcs split up, hoping to trap them and cut them apart. Elendil, with a group of orcs behind, sees a hill ahead. He and the Gondorians make for this in a desperate attempt to hold off their enemies. Little known to them, a large group of elves in the area has heard the sounds of battle, and is coming for them. Will they make it in time to save the Gondorian king and his men?

Forces:

Gondorians

Elendil on foot

14 Gondorian men with sword and shield

3 Gondorian men with spear and shield

1 Gondorian captain with sword and shield

10 High elves with swords

8 High elves with bows

1 High elf captain

Orcs

7 Orcs with sword and shield

8 Orcs with spear

4 Orcs with bow

4 Orcs with two-handed weapon

2 Goblins with spears

2 Goblins with sword and shield

1 Orc captain with sword and shield

10 Uruk-hai with sword and shield

10 Uruk-hai with pike (The Uruks are supposed to represent something like Haradrim or Easterlings, but still using Uruk-hai stats)

1 Uruk-hai captain with bow

2 Uruk-hai with bow

Layout

The orcs and Uruks are divided in half, one is setup on the right table edge, with their backs to the table edge. The rest are not deployed yet, but are later as per the special rules below. The Gondorians and Elendil start with the back line eight inches away from the Uruks. The elves are not deployed, but are later as per special rules.

Objective

If all the Gondorians are killed before the elves arrive, then the orcs get a major victory. If all the Gondorians are killed after the elves arrive, and all the orcs are killed, then it is a draw. If all the Gondorians are killed before the elves arrive, and all the elves are killed, then the orcs get a minor victory. If all the orcs are killed before the elves arrive, then the good guys get a major victory. If the orcs are all killed after the elves arrive, and at least Elendil survives from the Gondorians, then the good guys get a minor victory.

Special Rules

Split Up

Since the orcs split up, only half of them are deployed at the start of the game. The rest are deployed on the opposite table edge from the other orcs on the turn that one of the Gondorians moves onto the hill. They can move regularly the turn they come onto the field..

Elves

The elves are deployed 18 turns after the start of the game, and are deployed opposite the hill. They may charge and act as normal.

Unknown Enemies

Since the Gondorians can't see how many orcs are behind them because of the night, none of the Gondorians may charge an enemy model until they get onto the hill.

Pre-Game Thoughts

Gondorians and Elves

With only a tiny group of Gondorians, and 18 turns before help comes, I will need to shield with all of my men in combat so they can survive longer. I will need to use Elendil as much as possible since none of the enemies can really contend with his fight value of seven.

Orcs

Although it may seem like 18 turns is a long time, it probably won't once I get into combat. I'll need to blast through their lines, and then once the rest of the Gondorians are dead, I will surround Elendil and hack him down. However, this will probably take me past the turn that the elves arrive, so I will have to be quick with killing Elendil.

Turn 1

To start the game off, both sides moved forward at full speed. There was no combat or archery this turn, as both sides were intent on getting to their destinations.Turn 2

As in the previous turn, both sides moved forward full speed, with no combats or arrows fired.

Turn 3

Once again, both sides moved forward. The Gondorians were now in range of the hill, and would be on it by next turn. The orcs were hard on their heels.

Turn 4

The first of the Gondorians came onto the hill, and their joy at getting to the hill was short lived as they saw in the distance, on the opposite side of the hill, another group of Orcs and Uruks advancing towards them.

Turn 5

The Gondorians ran to the opposite side of the hill, hoping to make it there and get set up before the Uruks got there on that side. Elendil set himself up in the entrance to the hill on the near side.

Turn 6

The Gondorians continued their desperate attempt to stop the entrance to the hill before the Uruks got up. They managed to block it, but their spearmen and the captain were not in place. Elendil securely blocked the lower route, with several men to back him up. The Uruks charged forward, ready to do battle next turn. Several arrows were released by orcs, but none of the arrows hit.

Turn 7

The Orcs, with the sight of battle in front of them, charge forwards into the Gondorians. Elendil stoutly holds his entrance on the right, and takes down an Uruk, and uses his free Heroic Fight to charge into another orc. He takes a wound from that orc, however. On the left, there are no deaths. The orc archers are again off-target.

Turn 8

Once again the orcs get priority, and charge into battle again. Once again, Elendil takes down an orc, and then takes down the Uruk behind him. On the left, the orcs win their fight, but fail to kill the Gondorians.


Turn 9

The orcs charge forward again with a roar. This must have helped the orc archers, as they finally hit and killed a Gondorian spearman. In retaliation, Elendil easily took down an orc and an Uruk. The Gondorians on the left win their fight and take down the Uruk opposing them.

Turn 10

Elendil, now that he was sort of in the open, was attacked by lots of orcs, and receies two wounds, with only one left. On the other side, one orc and one uruk are killed in combat.

Turn 11

Once again, the orcs got priority and charged again. One gondorian spearman was cut down, but another Uruk was cut down in exchange. Elendil won his fight, but failed to wound his opposition.

Turn 12

The Gondorians, enlivened by the thought that reinforcements were on the way, charged forwards into the fray. However, it did not fare so well with them as in previous turns. One Gondorian was cut down, in exchange for only one Uruk.

Turn 13

The Gondorians win priority again and charge forwards. The orc archers, enlivened by the cries of battle, fire well this turn, and manage to kill a Gondorian with an arrow in the back. In retaliation, Elendil and some Gondorians manage to take down the Uruk captain and an orc. Another Gondorian is slain by the Uruks on the left side, however.

Turn 14

The orcs win priority back from the Gondorians. They rush into battle, and they do a lot of damage on the right side, where two Gondorians are cut down, and Elendil is finally killed. Two Uruks are killed on the opposite side, but no more Gondorians.

Turn 15

Once again, the orcs gain priority. The last Gondorian on the right is easily surrounded and killed. On the other side, two more Uruks are killed. However, the defenses on that side are being stretched now, as more Gondorians are pulled away to stop the Uruks from the right side.

Turn 16

The Gondorians finally win priority again. Another orc is cut down, but a Gondorian is also cut down. Only two more turns and the elves would arrive, and the orcs needed to kill eight more Gondorians.

Turn 17

Although the Gondorians get priority again, three more Gondorians are killed, in exchange for only one Goblin spearman.

Turn 18

The elves finally arrive, but as they watch, another Gondorian and the Gondorian captain are taken down in combat. However, four Gondorians survive by using their shields to defend themselves. The elven archers manage to pick off an orc archer also.

Turn 19

Although the elves have arrived, the orcs still pile onto the last of the Gondorian soldiers, and all four of them are killed easily. However, the elven archers show their accuracy by taking down an orc archer opposed to them.Turn 20

The elves charge forward into the fray, with the elven captain taking down an Uruk, and an elf taking down an orc. No other elves are killed, but the last orc archer and another Uruk lie dead with elven arrows in them at the end of the turn.

Turn 21

The orcs gain priority again, and charge into their combats. The elven captain, although attacked by five orcs, manages to win his fight and kills one of the Uruks. However, an elf is killed, and no other orcs are killed in combat. However, the elves fire yet another volley at the orcs advancing at them, and take down three orcs.

Turn 22

The elves get priority again, and so get to choose their fights. However, the elven captain is the only one who wins his fight, and he manages to take down two orcs. The elven archers are ineffective this turn.

Turn 23

The orcs gain priority, and the band of orcs led by the orc captain charges into the elven archers. Only one elf is killed in that area, however. Up on the hill, Another elf is killed, but an orc and Uruk are killed. An orc is killed down near the elven archers too.

Turn 24

The Elves gained priority, but it didn't help them much, as two elven swordsmen are killed and an elven archer in exchange for an Uruk and an orc.

Turn 25

The orcs gained priority back from the elves (anybody else see a pattern here?). However, the orc captain on the field was surrounded, and would have been killed, but fate intervened for him. An elf swordsman was killed, but an orc and an Uruk were killed in exchange.

Turn 26

Once again, the Elves get priority from the orcs. They do much better this turn, taking down three orcs and an Uruk in exchange for only one elf archer.

Turn 27

The orcs get priority (not surprising), and charge again at the elves. However, the orc captain, an orc, and a goblin spearman are all killed in exchange for only one elven swordsman.

Turn 28

The orcs get priority again, but not many elves or orcs are killed. Only one Uruk spearman is killed.

Turn 29

Another Uruk is killed this turn, and one elven swordsman.

Turn 30

The elven captain charges into two goblins, and kills them both. Nobody else is killed.

Turn 31

The last two orcs are killed, the game ending in a draw.

Conclusion

Good Side

Well, things were looking really good for a while, until Elendil got killed. If I had pulled him back some and not charged in where he had so many opponents, than he would have stayed alive longer, and thus protected that side longer. Overall, I'm surprised at how long the Gondorians did last before the elves arrived.

Evil Side

Things looked really bad at first, since I couldn't get any kills with my Uruks. However, once Elendil fell, the Gondorians were stretched so far that they couldn't tackle the large amount of Orcs and Uruks I was sending at them. In the end, I'm fortunate I managed to kill all the Gondorians I did kill.

Writer's Thoughts

While playing this scenario, I saw that I made it too hard on the good side. Maybe if I changed the time before reinforcements came from 18 turns to 15 turns, it would be better. Also, I think next time I'll use orcs instead of Uruk-hai.
Thursday, October 11, 2007

Fishes and Reptiles

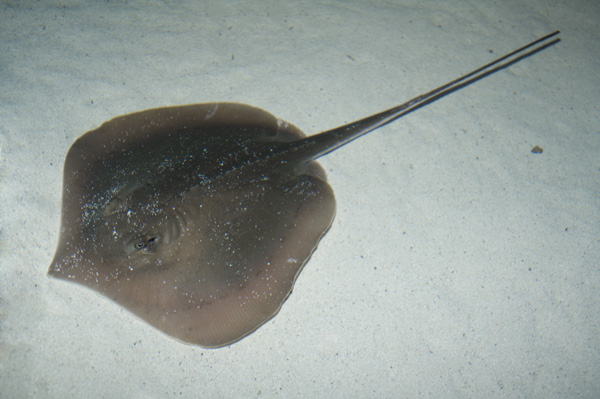
Ok, back to marine biology for a bit. Don't worry, I've got another LOTR battle report in the works, so hang on. :) So, I was talking about sharks. Now, about rays and skates. There are about 500 species of rays and skates in the ocean. A ray or skate's body shape is flattened with a thin, distinct tail. They are demersal, which means they live on the bottom of the ocean. They have five gill slits on their ventral side, and their eyes are located on the top of their heads. Stingrays have a whip-like tail that has stinging spines at its base. They rest on the bottom of the ocean because that's where their food is. They eat clams, shrimp, crabs, and other small animals. They do this with plates in their mouth that are large and flat, and are made of calcified material that can easily crush their victims. Manta rays feed on plankton. Skates have a more fleshy tail than rays.

Most fishes in creation are in class Osteichthyes. They are called bony fishes. Their skeletons are made at least partially of bone. Bony fishes have scales formed from bone on their outside, unlike cartilaginous fishes. They use what is called a swim bladder or air bladder to stay afloat. Sharks use a large liver to keep up. A fishes' body shape is determined by its lifestyle. There are various types of body shapes; they are: ray-like, flat, box-shaped, disc-shaped, tapered, elongated, and eel-like. Fishes use different colorations for camouflage, disguise, or advertisement. Fishes have myomeres, which are bands of muscle along the sides of fishes used by them for locomotion.

Fishes have a countercurrent system of blood flow. In this system, the blood in the gills flows in the opposite direction from that of the water. Because of this system, there is oxygen diffusion occurring along the entire gill as the water moves over it.

After studying the fishes, I studied the rest of the Marine Vertebrates. The first class I studied was Class Reptilia. This contains, of course, reptilians, like alligators, lizards, snakes, and turtles. Marine reptiles breathe air with their lungs, and so they must regularly return to the surface for air. Unlike a land turtle, a sea turtle cannot pull its head and appendages all the way into its shell (or carapace). In addition, sea turtles have flippers as opposed to thick, clawed legs of land turtles. Sea turtles sleep by sleeping for an hour and then going up to the surface for air, and then going to sleep. Other kinds of sea turtles sleep at the surface with their nostrils about the surface so they can breathe.

Sea snakes look a lot like land turtles except for a laterally flattened tail that aids in their swimming. They are all extremely poisonous, and are more common than the poisonous land snakes. The bite of a sea snake can kill a human, although they rarely attack humans. Marine iguanas do not live exclusively in the ocean, but spend much of their time on the shore so as to keep their bodies warm. They live on the Galapagos Islands off the western coast of South America.

Some pictures:

Stingray

My favorite type of fish, the clown fish:

And here's a cute picture that was on my iGoogle as the random picture of the week.
The one on the right looks like Curly (Laura's guinea pig)
http://www.pmstudios.co.uk/FeaturedPictures/POW2007/slides/D07_9096.html

Thursday, October 4, 2007

LOTR Miniature Game

So, I'm going to give you a *brief* overview of the Lord of the Rings miniatures game. It's kind of complicated, and I'll be going over some of those things, so stay with me. Or, if you know enough about them, you can just skip down to the battle report in the next post :).

Essentially, the game is played in turns. Each turns consists of several phases. The first phase is the priority phase, where the good side and the evil side rolls a dice each to see who gets to go first for all the phases in that turn. The next phase is the move phase, where the models move. Each race has their different movement; for example, elves, orcs, men, and wizards can move 6 inches every turn. Goblins can move 5 inches, and cavalry can move 10 inches. During this phase models move into combat with each other. When doing this, two models may attack one model, but two may not attack two models. For example, two elves charge an orc. There is another orc nearby, and he wants to get into the fight; however, he cannot because the two elves are both in combat with the first orc. Models that have spears and pikes can use those to back up friendly models; for example, suppose that the second orc I mentioned before had a spear; he could come up to the back of his friend and use his spear to support him. Pikemen can do this also, but they can go three back; suppose there is are two pikemen, instead of that one other orc. They can both help out the orc, but nobody else can. Archers that want to shoot in the next phase (shoot phase) can only move half of their move.

The next phase is the shoot phase, in which all models with bows that have not moved more than half their move shoot. They do this by first rolling a dice to see if they hit; there is a number for all archers, and they have to roll this number or higher. For example, for elves, it is 3. For orcs, it's 5. If they hit, then they roll again to see if they wound; they do this by using a table comparing the strength of the bow and the defense of the model.

The final phase is the fight phase. This is (of course) the phase where all combats are worked out. Each model has its own number of attacks, and this is the number of dice it rolls when working out combats. Generally, regular soldiers have 1 attack. When working out a combat, you first roll a dice for the number of attacks for each miniature in the fight. For example, let's say there were two elves against an orc backed up by another orc with a spear. Since the elves charged first, they get to roll first. They each have one attack, and so the good side rolls two dice. They roll a 3 and a 5. The orcs then roll, and they roll a 1 and a 5. Since they both rolled a 5, who won the combat? Easy. All models have a fight value; elves have a fight value of 5, while orcs have a fight value of 3, so the elves win the fight. Now, the elves get to roll two more dice to see if they can wound the orc. They can't wound the orc with the spear, so they concentrate their attacks on the one in front. They roll a 6 and a 2. In order to find if they killed the orc or not, you take a chart, and compare the attacker's strength and the defenses' defense. In this case, the elves need a 5 to kill, so the orc is killed.

Now, on to some more complicated things. Especially, Might, Will and Fate. Most heroes have some might, will, or fate (in addition to Fight value, wound, attack, courage (which I'll talk about later), Strength, Defense, etc.). So, first is Might. Might is used by heroes in fights, in archery, or wherever. It is used to up their rolls; for example, suppose Aragorn is being attacked by two orcs. He rolls a 1, 4, and 2. The orcs roll a 5 and a 6. The orcs won the fight, right? Well, Aragorn has 3 points of Might, so he can use two of those to up his highest roll to a six, meaning, since he has a higher fight value, he wins the fight, and can then wound the orcs. He can also use whatever might he has left when he is trying to wound the orcs.

Will is used mainly for magic. It can be used to resist magic, or cast it. Heroes that have magical abilities can use up however many points of will they want to try to cast one of their spells, and if they roll the necessary number for that spell, then it is successful. However, if it is a hero they are casting it on, then that hero can try to resist this. He can choose how much will he wants to use (he has a set amount, in most cases), and then however much will he uses is how many dice he rolls. If he rolls a 4+ on any of the dice, then he has successfully blocked the magic.

Fate is used to try to stop that hero from being wounded. Suppose, in our Aragorn scenario, that Aragorn was out of might, and the orcs won, and they both wounded Aragorn. Since Aragorn has 3 wounds and 3 fate, he can use two of his fate to try to stop those wounds. If he rolls a 4+ on his fate roll, then he has successfully saved the wound; let's say that he fails one fate roll and makes the other; he then has 1 fate and 2 wounds left, since he saved one of them.

Now, lastly, we have courage. Courage is used when either A). A force is broken (half of the models are killed), B). When a model charges a terrifying enemy (Like Sauron, a Troll, etc.). You take a courage test by rolling two dice; you add these two numbers on the dice together as well as the courage of the model. If it's higher than 10, then the model passes it; if not, then the model must flee it's full move away from the terrifying enemy, or towards the nearest board edge if broken force. So, let's say an elf wants to charge Sauron; he has a courage of 5. So, we roll two dice, and they are 3 and 1. So, 3+1+5=9. Since 9 is less than 10, the elf fails the courage test, and cannot charge Sauron.

Sooo…that's about it. There's still lots more about special cavalry rules, special rules for heroes, etc, but you get to know that as you play. Now, you can read my battle report, which I'll have pictures up for soon. :)

Battle Report (read previous post first)

So, here's a battle I had with all of my miniatures.

Pre-game thoughts:

Good guys: My main strategy with the good guys is to split them into two groups, with Gil-galad leading the main group with the greater number of troops straight towards the gap between the hills. Elendil will lead the other group with the archers, Aragorn, and his riders to take the right hill, leave the archers there, and then attack the back of the bad guys' main group with the rest of my troops. Hopefully, Gil-galad would be able to keep Sauron from doing enough damage long enough for the other group to get into attack position.

Bad guys: Since Sauron is extremely hard to kill, I'll put him in the gap between the two hills with the Cave troll to back him up. I'll put all my Uruk-hai behind them, with orcs with spears and Uruks with pikes to back them up. I'll send the rest of my orcs up over to the hill led by my six warg riders, Gothmog, and my Troll Chieftain, with all of my wizards in the back (Saruman, Witch King, Ringwraith, two barrow wights, Mouth of Sauron). Hopefully, the wizards will be able to immobilize any heroes that come onto the hill, my forces will be able to kill them easily, and I can then come around to the back of the main force of the good guys and squish them.

The first turn, both sides moved forward full speed. The wargs and the Mordor Troll Chieftain separated off from the rest of the group with the archers and several orcs following them; the bad guy's wizards were in the back. Sauron moved forward towards the gap between the two hills with his orcs and Uruk-hai behind him.

The second turn, both sides continued to move forward; Sauron moved into the gap, effectively closing that way. The cave troll came behind him to support him; the warg riders moved onto the hill with the MTC following them and the orcs. The good guys continued to move forward quickly, not separating off.

The third turn, Sauron stayed where he was, while the wargs moved into position at the entrance onto the hill to stop whoever came up. The MTC moved behind them, with the orcs behind; the archers moved into a position where they could fire on the advancing troops. The good guys split into their two groups, Elendil leading the charge towards the hill, and Gil-galad leading the charge towards Sauron.

The fourth turn, Aragorn with his riders moved into position where they could attack the wargs who waited at the entrance of the path onto the hill; there would be combat next turn. Elendil followed him with the main group, and Gil-galad kept advancing.

The fifth turn, combat ensued. Aragorn attacked Gothmog, while Elendil and Boromir took on an orc captain mounted on a warg. The orc and Uruk-hai archers let loose their first arrows, but failed to wound anybody. In combat, Gothmog received three wounds, managed to save two of them with fate; he only had two wounds left now. The orc captain received two wounds, but was also saved by his fate, with only one wound left.

Turn six saw Gil-galad move within range of attacking Sauron next turn. Aragorn charged Gothmog again, and Elendil and Boromir moved in to finish off the captain. Saruman took the opportunity to immobilize Aragorn (meaning he cannot move again that turn and his attacks in fights are 1), using the special rule that he can use immobilize anywhere on the board because of his palantir. The orc's archery was again off, and no elves were killed. However, the orc archers on wargs managed to get some hits, and a rider of Rohan got his horse shot out from under him. In return, the elven archers shot an orc off of his warg. In combat, Aragorn did not receive any wounds, but the orc captain was killed, and Elendil used his special rule (if he kills all his enemies in combat, he can move forward and attack more enemies, but only once per turn) to kill another warg rider.

Turn seven was the beginning of the fight between Gil-galad and Sauron. Gil-galad took a wound from Sauron even before fighting, from Sauron's magic. Elendil was immobilized and attacked by the troll chieftain and the warg that got its rider shot off it. Aragorn was again immobilized and attacked by Gothmog. None of the archers on either side do any damage. Sauron is immobilized by the wizards, but no wounds are scored on him. Elendil does not receive any wounds as the troll chieftain is immobilized also. Only one wound is taken by Aragorn, but he fails to recover it with his fate.


The battle raged on in turn eight. Since Sauron immobilized Gil-galad, and Sauron was immobilized himself, no wounds were hit on either side. Elendil was not immobilized, and managed to get 1 wound on the Troll Chieftain. Aragorn is wounded even more, and only has one wound left. Again, the archery on either side does no damage.

Once again, Sauron was immobilized, but the barrow wights up on the hill manage to paralyze Gil-galad, meaning he rolls no attacks in combat, and receives double the amount of damage when wounded. Aragorn is again immobilized, and this turn Gothmog kills him and another rider of Rohan. Both Elendil and the Troll Chieftain are immobilized, so no one is hurt. Archers fail again in their fire.


Turn eleven was a bad turn for the good guys. The good guys' wizards failed to immobilize Sauron, and Sauron finished off Gil-galad. The Troll Chieftain was wounded once by Boromir, but one elf was cut down by Gothmog. Neither side wounded anybody with archers.


Turn twelve saw things go fairly badly for the good guys. Gimli received one wound, but failed to recover it using fate. Another elf warrior was killed by Gothmog, but the Troll Chieftain was not wounded. Arrows flew on both sides, but nobody was hurt.

Turn thirteen was again a bad turn for the good guys. Although Sauron was immobilized, the cave troll behind him, since he had a spear, could use his attacks to help Sauron also; these two managed to finish off Gimli and kill another elf. Elendil is paralyzed, and Gothmog gives him two more wounds; only one wound is left. The captain of Gondor receives a wound from the warg rider (the rider threw his spear at him), saved it by fate, and killed the warg rider.


Turn fourteen was not such a bad turn; nobody was wounded in the Sauron battle, and neither Boromir, Elendil, or the Troll Chieftain were wounded. The archery for both sides was better, as another rider of Rohan had his horse shot out from under him, and the orc archer on the warg had his warg shot out from under him. The Gondorian captain was finished by Gothmog, and a rider of Rohan finished off the last of the warg riders.


Next turn, Sauron took on two men, killed another elf by using his magical powers, was immobilized, but not wounded. The cave troll also was immobilized, but won his fight against the elven captain. Elendil was finished off by Gothmog, Boromir fought off two uruks and the troll chieftain immobilized. The Uruk-hai captian was wounded by a rider of Rohan, but saved the wound with fate. The elven archers managed to hit the Mouth of Sauron and wound him once, and he failed to recover it using his one fate. Other archery was ineffective.

The wizards on the good side were completely ineffective in regards to immobilization; neither Sauron, the cave troll, or the Troll Chieftain were immobilized. Sauron won his combat, and killed the two elves that attacked him. The Cave troll won his combat against the elf captain, but failed to wound. Boromir, on the other hand, was surrounded by an Uruk-hai archer, the Troll Chieftain, and Gothmog, and was easily killed. The Uruk-hai captain was charged by two riders of Rohan, but killed one of them. The Mouth of Sauron and the other bad guy wizards took cover, and so none of them were wounded.

This time, the bad guys got priority, so Sauron used his three free will points to kill another elf. He was then immobilized along with the cave troll. He did not receive any wounds, and neither did the cave troll. Gothmog, the Uruk-hai captain, and an orc managed to take down a rider of Rohan. The Rohan archers manage to kill an orc, however.

The bad guys gained priority again in turn 18; Sauron was unable to kill anybody with his magical powers, and was promptly immobilized; however, the cave troll was not immobilized, and gave the elven captain two wounds, one of which was recovered with fate. The orc archers finally managed to do some damage, and killed an elven swordsman. The elven archers returned by forming lines and slaying four orcs with their arrows. Haldir bravely charged the Troll Chieftain, but was hewn apart in one turn.


Again, the bad guys got priority. Sauron used his powers to kill yet another Gondorian soldier; he and the cave troll went to one side to allow the orcs and uruk-hai behind them to come forward into the fight. The troll chieftain charged two more elves, and killed them both. The Uruks killed another Gondorian, and the orc archers killed two more Gondorians; the elven bows responded by taking down four orcs.


The bad guys followed up on their advantage by getting priority again in turn 19. Sauron used all of his will for that turn by finishing the elven captain. Two more men fell to Uruk-hai in the battle near Sauron; the troll Chieftain failed to kill anybody, and nobody was hurt by the archery.


The good guys got priority in the twentieth turn. Sauron was immobilized, but the cave troll was not. The troll chieftain was attacked by several elves and Legolas, but was not wounded. The Cave Troll killed two men, and another man was taken down by uruks. The orc archers also picked off another man, bringing the good forces to the breaking point; they would have to take courage tests next turn. Two goblins were killed, one by archery, the other by combat to an elf archer. The elven archers also killed an Uruk-hai archer.


The bad guys got priority again, and Sauron used all his will to slay two more Gondorian soldiers; he was then immobilized by Radaghast, the only wizard not in combat. The Troll Chieftain again failed to do any damage or receive any. Another Uruk-hai archer was shot down by the elf archers. Since their force was broken, the good guys had to take courage tests; two Rohan archers fled the battle, and one elf archer started to run in the direction of the table edge.


The good guys got priority this time, and managed to immobilize Sauron and the cave troll, leaving only one combat up front; this resulted in the last Gondorian soldier dying. The troll Chieftain finally won his combat, and ripped Legolas apart in one turn, Legolas of course failing one of his fate rolls. The Mouth of Sauron was finished off by the elven archers.


The good guys again got priority in the 23d turn. The good guys' forces was falling apart, as Galadriel failed her Courage Test (rolled 2 one's) and ran off the board edge. Two elves failed their courage tests and ran towards the nearest board edge, but are not lost yet. Three men fail their courage tests and run off the board, however. The elves and the remaining wizards start moving towards each other, intent on making one last stand before going down. Sauron, the Cave Troll, and the two leading Uruk-hai are immobilized; the Troll Chieftain takes down an elf, and the Cave Troll wins his fight against Theoden, but cannot wound him because he's immobilized.

In turn 24, the bad guys got priority, and Sauron used magic to wound Theoden once; Saruman then immobilized him, and Theoden was then cut down by 6 orcs, Uruks, and an immobilized cave troll. The elves left formed a circle around the wizards, hoping to protect them. Another elf failed his courage test and fled the battle. The last Gondorian soldier fought off the Troll Chieftain.

There are no combats except one this turn. Sauron and his minions move closer to the ring of elves surrounding the wizards, and the last Gondorian soldier is cut down by the Uruk-hai captain. An Uruk-hai is picked off by one of the elven archers, but no other arrows find their mark.


The bad guys smashed into the small ring of elven archers with the wizards in the middle in turn 26. Radaghast failed his courage test and pushed through an elf, and runs off the table edge. Sauron is immobilized, but the Cave Troll, Troll Chieftain, and Gothmog are free to do as they will; the Cave troll takes down an elf, the chieftain takes down two, and Gothmog takes down two as well. Two other elves are killed by the Uruk-hai. The good guys are truly making their last stand.


The bad guys got priority again, and charged the remaining elves and wizards. Four more elves were killed, and Gandalf was finished off. Celeborn received three wounds; he used all three fate, but failed all three times, but used all his might to save two of the wounds. Only he and another elf were left now.


The final turn, turn 28, finished with the good guys getting priority; however, Celeborn and the last elf were finished off, leaving the bad guys with a major victory as they didn't lose over half their troops.


Final Thoughts:

Good guys:

Wow. A lot went wrong here. The wizards immobilized Sauron, but failed to immobilize the cave troll, and that was the demise of the main group. Also, I sent the other group on a fruitless mission which resulted in not much other than the entire group being eliminated; they did take out over 18 orcs and wargs though, so that was something.

Bad guys:

This went a lot better than I expected. The wizards were deadly, immobilizing any good heroes that were threatening my force, and then the orcs and other guys could easily take them out. A major victory!